Wednesday, April 6, 2016

Assembly continues

Fitting the X-axis ball screws with bearing blocks and NEMA 23 270 oz/in steppers on each side.  The aluminium covering was added as a dust cover.
Positioning the second rail parallel to the first.

First drive of the screws with the laptop.

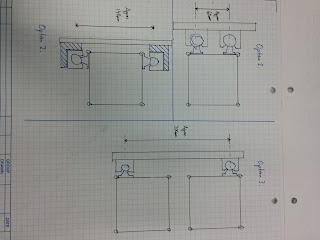
Looking at our gantry design options.


Concepts for mounting the Y-axis linear bearings.  Getting the bearings as far apart as possible will help with machine rigidity.


Our 300w Ryobi trimming router with 1/4" collet that we had laying around.  This was used prior to upgrading.


Moving the old girl.
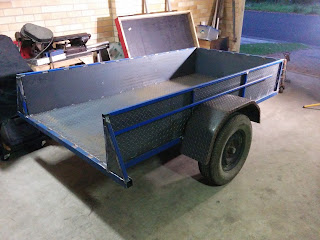
Moving the frame took a bit of pre planning and utilisation of the equipment that I had available.


Once it was on the trailer I needed to disassemble the engine crane and load it in the trailer so I could lift it off at the other end.  Note the tailgate of the trailer can still open and close with the lid on.  I had planned this to be a feature as it has frustrated me in the past with some designs.


Home sweet home at the parents place.


Parts!

We have parts. 

Ball screws, linear rails, bearings direct from China.


Mock up of the Z-axis

Marking out the aluminium extrusion for the first linear rail.  I used the extrusion itself for our "straight" reference.


Transfer punches were a fantastic purchase! Allowed us to easily mark the locations of all holes so we could use centre drills, pilot drills, final drill and chamfer while maintain hole accuracy.

I started with the drill press but with 240 something holes to drill for the linear rails, I started using the cordless drill and found it far quicker.


Using the drill press to guide the tap in was giving a good thread but was painfully slow.

I fabricated a simple jig with a 1/4" socket extension and a tap holder chuck (these are great) and a T-handle.  This was far quicker for tapping the holes.  (Also aluminium cutting fluid for drilling and tapping is a must, so much nicer) 


I soon found that I could reliably use a cordless drill to tap the holes.  As long as I cleaned the swarf each time.  Didn't break a single M5 tap.


Frame fabrication.

The first challenge was how do you make a flat plane, when you don't have one to reference off....

After a lot of searching and researching laser levels.  The most cost effective method for us was to use good old gravity.

We used two large aluminium extrusions with a bucket level or 4 point water level at all corners.  We adjusted until all corners were within a single, level plane.  The assumption here was that the aluminium beam were straight and would have minimal deflection during fabrication.


The concept and the test build.

This project began as an idea between a few friends.  The more to research and talked about it.  The more and more the idea became set into stone.

We started small with the idea of converting bench top mill such as a Seig X2, but we were never happy with the work area limits.  So we decided to be build a router with a stretch goal of being able to cut aluminium.

After many design iterations we can up with something the resembled the image below.  The theory behind the truss table frame was to create a fully diagonalised truss frame that would have a high stiffness the weight ratio.  This ment less steel (cheaper raw material cost), easier to move around and high rigidity.  Also I really wanted to put my TIG welding skills to the test and see how accurately I could fabricate a frame.


During our design phase I wanted to improve my TIG welding skills and test a few ideas before I fabricated the frame.  I also needed to plan ahead with this project as at the time I was renting a share house with a double garage, which I would fabricate in.  Yet the machine was to live at my parents place an hour away.

My old box trailer was rusting to bits so I decided to fabricate a new one and incorporate all my ideas I had been collecting for years.


I was pretty happy with the build in the end.  I was able to improve my welding proficiency and practice minimising heat distortion in the frame.  I also had a method for transporting the frame.