Wednesday, July 26, 2017

More experimentation

 Had a play around at drilling PCDs into turned aluminium parts.  I first machined a bore into some timber as a simple fixture then pressed the part into place.  I later on did another part with spot drilling first and counter boring.  was very happy with the results.


 I was also looking for a neat way to store my fasteners, yet still be able to take them places for installs and prevent double handling.  I settled on using Tactix boxes from Bunnings and decided to build a rolling island bench for them.

Part of my workshop improvements was to fabricate a new bench that all my tools and equipment could fit underneath,
I cut slots into the table and designed brackets that allow the bench grinder and bench vice to be pushed back against the wall and out of the way when not in use.  I have always found this to be a pain with bench grinders in small workshops.


A few of the little projects i've undertaken lately

Cutting out MDF letters


Making a new drill bit organiser.  Made from 15mm HDPE plastic, using a spiral surfacing pattern.


 Machined a new gear stick knob for my car.  Was very happy with the quality of the engraving on the brass plate.  Also got to test out my new parting off tool in the lathe for this one and using super glue to hold down small parts while machining them.  Worked a treat.

For the Z-axis upgrade for the CNC router I wanted to cut down on some of the travelling mass of the system.  With these pockets and some other features I should be able to drastically improve the Z-axis stiffness while keeping the same mass as the current system.  Before and after stiffness values to presented once I install it.  Material is 6mm 5000 series alloy plate.  Cutter is 6mm single flute, 15000 RPM, 1200mm/min feed, 0.5mm DOC. 


Was very impressed I was able to machine brass with a 4mm bull nose R1 cutter.


Made a pen holder with a spring loaded Z-axis.  Plan for this is to use it as a plotter for making sails for my sailing dinghy in the future.


Turning some decent sized aluminium parts and testing out my new carbide inserts for aluminium.


Practice piece for making a plywood child's toy box.  Finally starting to play with some digital joinery.


Some more turned parts and my first go at threading on the lathe.  just happened to be in a bore and against a shoulder, certainly know how to make it challenging for myself.

Testing out a new radius tool for the lathe.

Tuesday, January 10, 2017

Z-axis gauge block

For some time we have just been setting the Z-axis height by touch or using the old "piece of paper" trick.  So we decided to upgrade and buy one of these cheap ebay tool touch sensors with the idea of connecting it to the mach4 software to perform z-height calibration automatically.

Although we found a problem.  The touch block had no give or spring in the design so a simple push of the z-axis too far would drive the tool down into the device and destroy the tips.
So I can up with the concept below.  Essential to use the lathe to make a few simple parts that allowed a touch sensor with a pre-loaded spring to allow for some movement during tool contact.


After turning and installing the electrical contact below.


First test run with a 9v battery and an LED strip light.


A slight refinement by packaging the unit together.  This is now a stand alone unit that can be placed at the opposite end of the table to the computer, while I calibrate the z-axis and just watch for it to light up.  So far it has been repeatable to within ±0.04mm in the same setup.


Computer Monitor Stand

In order to start neatening things up a bit and replacing those "Temporary fixes" which always seem to become permeant.  We have finally upgraded our monitor and keyboard station.  (Any excuse to turn up some bits and crack out the welder really).


The main post will provide an access point to supply power to the machine via the roof and pick it up off the floor.  We can also run the dust extractor exhaust up to the roof and outside to vent the hot air created by the vacuum outside.


Sunday, January 8, 2017

Nissan Patrol - Gullwing Windows - Mk1

The side window frames in my 1991 Nissan GQ Patrol were starting to rust out pretty bad.  I've been thinking about adding gullwing windows for some time to help with storage and access to camping gear.  So I decided to have a go, this in how far I got in 8 hours - removal, measurement, design, cut and fit.

Frames had completely rusted thru on the bottom.

The opening is very significant and greatly improves access behind the cargo barrier.


Standard pinch-weld trimming with seals worked a treat.


Facing a slab of scratched up 15mm thick HDPE plastic stock.


Trial fitting.


Hinges and latches installed.


Design revision 2 won't be too far away, as the hinge design and latching requires refinement to ensure the seal is compressed sufficiently to be water and dust proof.  Once the design is satisfactory, i'll build the left side as well.

Project Update

Been a little while since we have done an update, but here a few of the projects I have been working on over the last few months.

Piston clock for me desk.  Out of a BMW V8.

A coffee sign for a friends cafĂ© he has just opened up.  The sign is mounted inside a push-bike frame.


In order to reduce the acoustic noise pollution to environment from the CNC machine I have rebuilt the walls of the garage with insulation and multiple layers of villaboard (compressed cement).  The next step was to install a solid heavy door and create a tight seal.  This needed a latch to pull to door against its seal like a ship or submarine bulkhead door.

I came up with these design, then decided it didn't have enough gears, nor was it complicated enough so decided to add a 3:1 reduction planetary gear set to the assembly.


A new hallstand for home.  The concept was to be a little creative and experiment with casting clear polyester resins into furniture.  I am very pleased with the results.


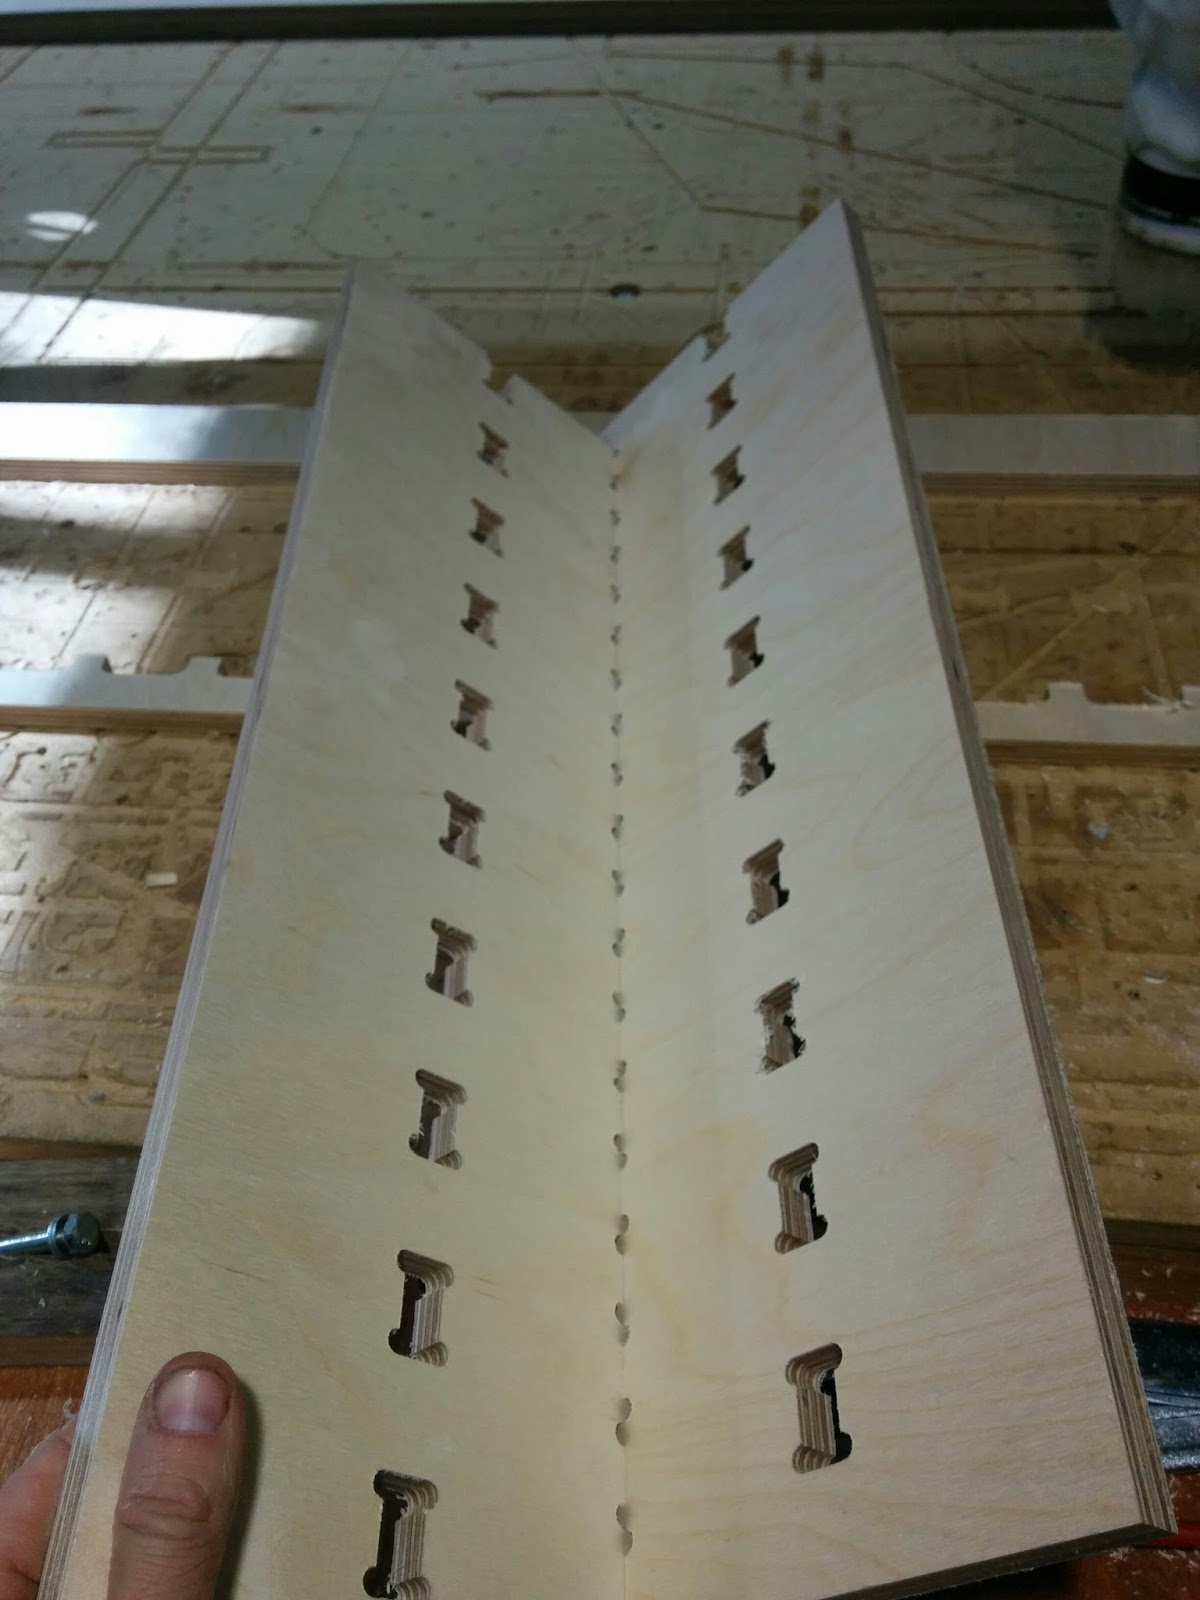
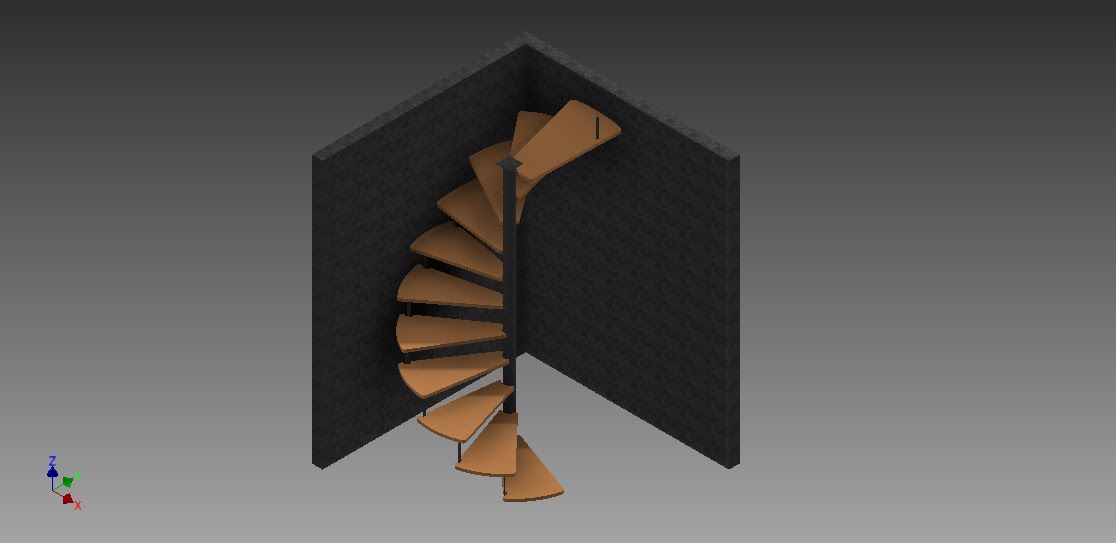
Helping a friend make there spiral staircase safer and look better at the same time.


Playing with nesting features in CAM software and trying to great the most efficient tool paths and layouts possible, certainly are large reductions in machine times to be made here. 


Also a little side lesson we learnt.  Machining of tabs to holds parts together allows the creating on flexible hinges in parts.  This could be a handy design feature I expect to be exploiting in the future with some of my designs.